Getting started, step by step
Follow these steps to download Mobility Mapper, set your phone up, record your first journey, and start adding the barriers, accessible toilets and Blue Badge parking you find.
The app works the same way on both phones, but a few setup steps differ. Use the iPhone / Android switch below to see the right instructions for your phone.
Using a screen reader? See our guide to using the app with VoiceOver or TalkBack.
Part 1: Creating your account
Step 1
Get the app
iPhone: Search for Mobility Mapper in the App Store and install it — it's free. You can also open the App Store listing directly. You'll need iOS 15.1 or later. Open the app once it has installed, and the rest of this guide takes you through the setup.
Android: Search for Mobility Mapper in the Play Store and install it — it's free. You can also open the Play Store listing directly. You'll need Android 8.0 or later. Open the app once it has installed, and the rest of this guide takes you through the setup.
Step 2
Tap Get Started
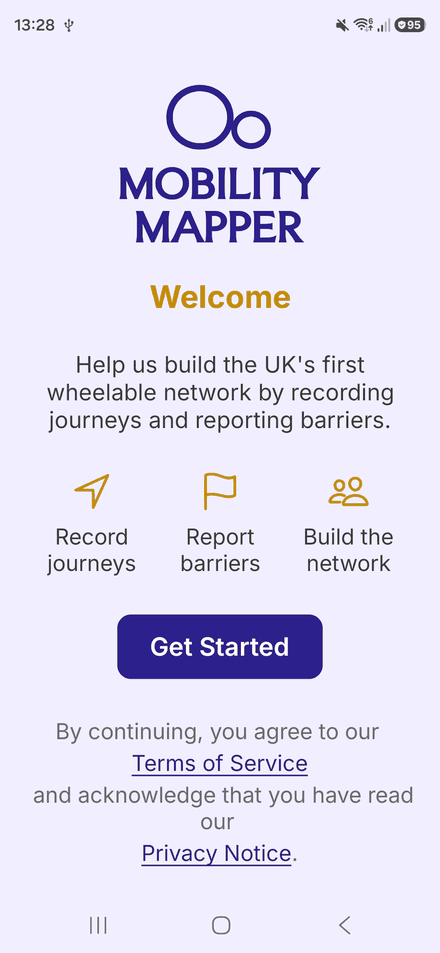
The first screen says Welcome and sums up what the app does: record journeys, report barriers, and find, add and edit accessible toilets and disabled parking. Tap Get Started. Note that tapping it means you accept our Terms of Service and confirm you have read our Privacy Notice — there is no separate tick box.
Step 3
Create your account
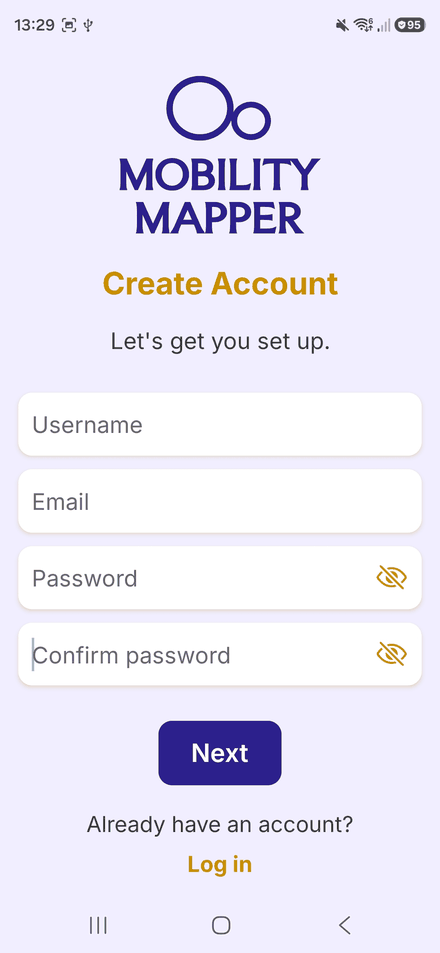
On Create Account, fill in the four boxes. Your username must be 4 to 12 characters and can use only letters, numbers and underscores. Your password must be at least 8 characters. Type it identically in Confirm password, then tap Next.
Step 4
Enter your email code
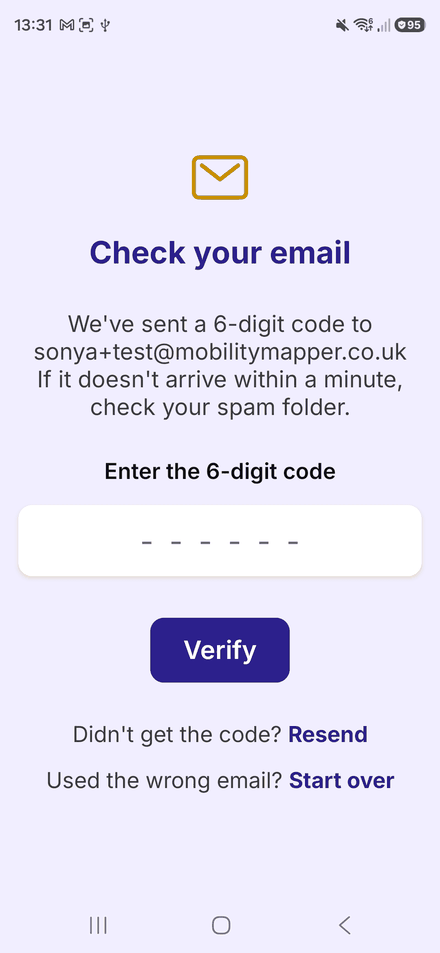
We email you a 6-digit code — the screen says Check your email. Type the code in; it submits itself as soon as you enter the sixth digit. If nothing arrives within a minute, check your spam folder, or tap Resend. The code expires after 15 minutes.
Step 5
Your email is confirmed
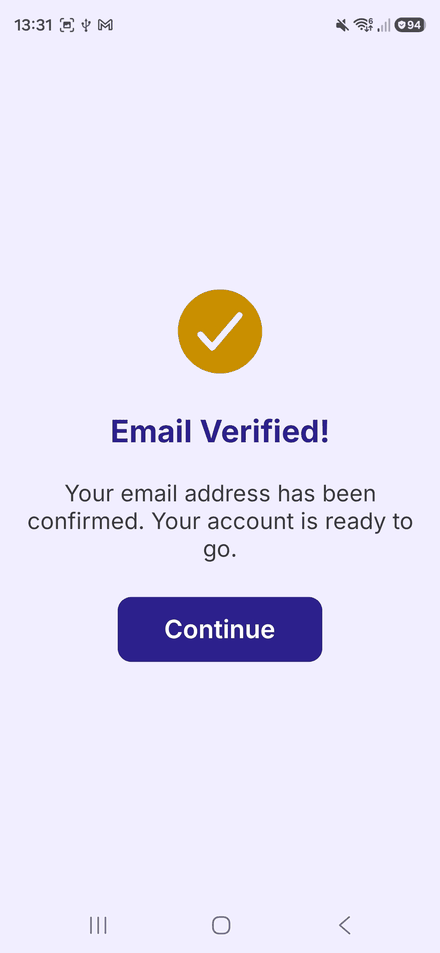
Email Verified! means your account is ready. Tap Continue.
Step 6
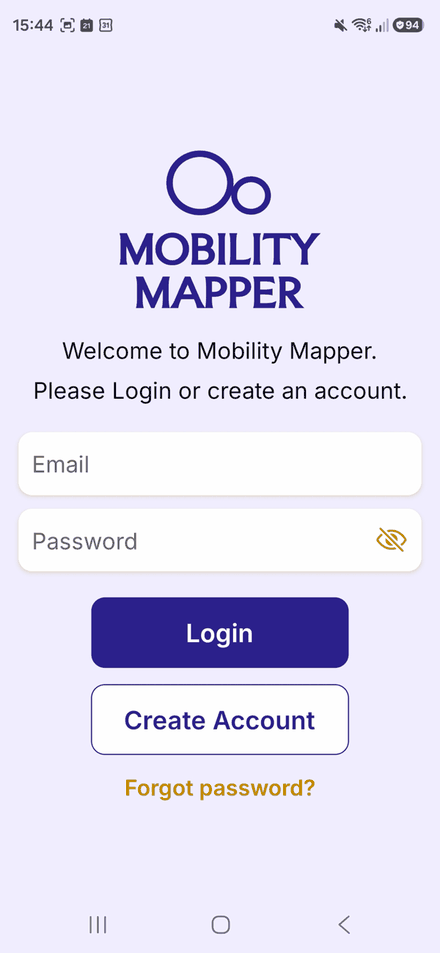
Logging in another time
You stay signed in, so you won't normally see the Log in screen again. If you are ever signed out, enter your email and password — the eye icon shows the password as you type — and tap Log in.
Part 2: Setting up your phone
Step 7
Start the setup wizard
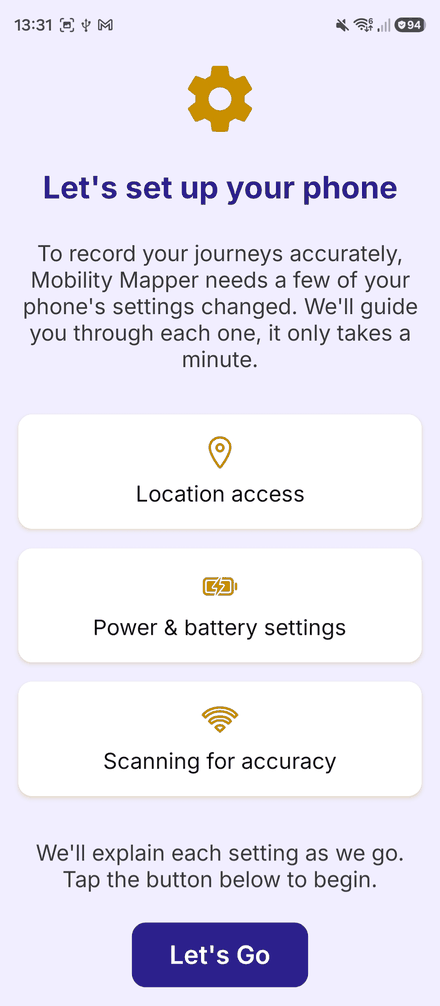
Let's set up your phone lists what the app needs to record journeys accurately. On Android that's Location access, Power & battery settings and Scanning for accuracy; on iPhone only Location access is needed, so the wizard is shorter. Tap Let's Go and it walks you through each one. Background location is not asked for here — the app asks for that later, the first time you start a journey (see Part 6).
Step 8
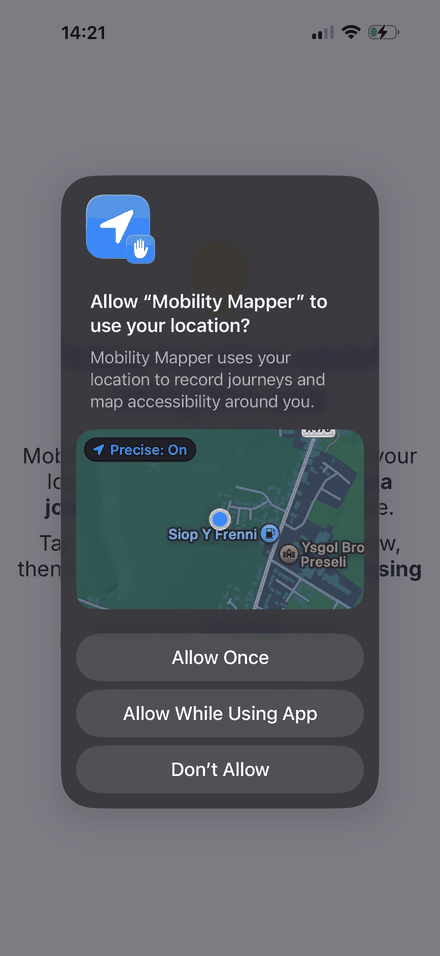
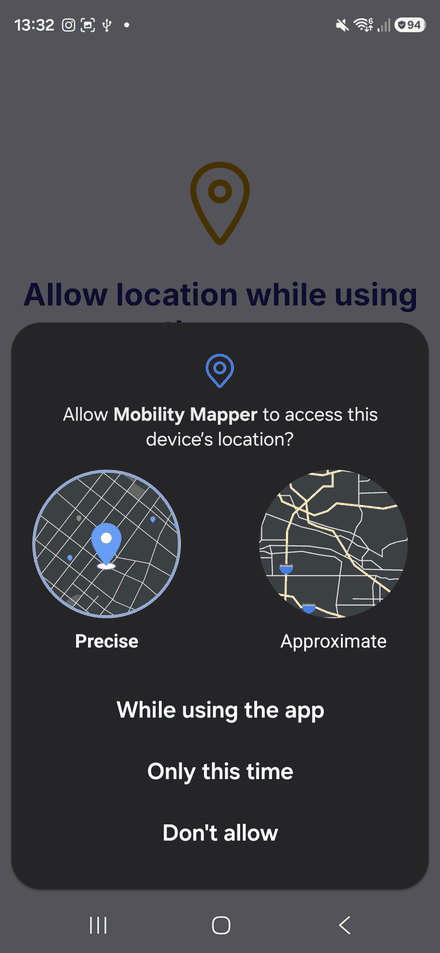
Allow location
Tap Allow location. iPhone: in the dialog, tap Allow While Using App, and make sure Precise is on.Android: the dialog has two parts. At the top, choose Precise (not Approximate). Then further down, tap While using the app.
Step 9
Battery and power settings Android only
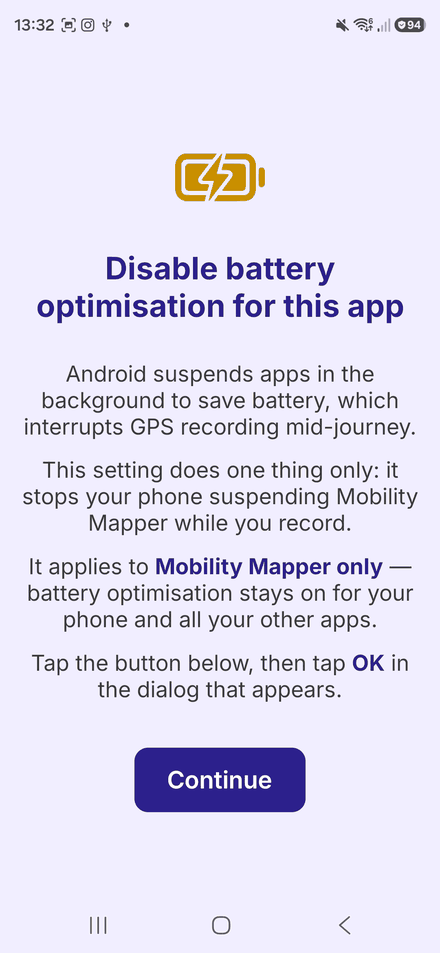
This step is Android only — iPhones skip it. Android can shut the app down mid-journey to save power, which loses part of your route. The wizard asks you to Disable battery optimisation — tap Continue, then OK in the dialog. It applies to Mobility Mapper only. If recording still cuts out later, our Android recording guide covers the remaining phone settings.
Step 10
Turn on notifications
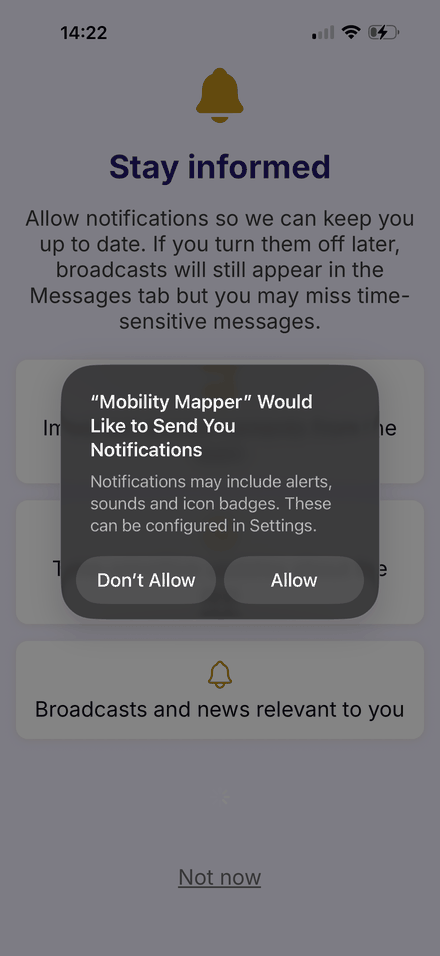
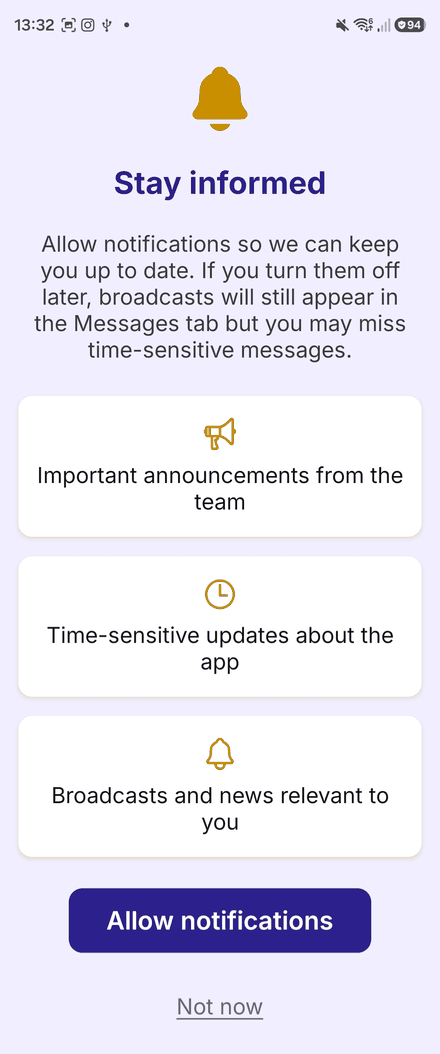
On Stay informed, tap Allow notifications, then allow it in the system prompt. Notifications warn you if recording stops, and tell you when another wheeler confirms or edits something you added. If you skip this, messages from the team still appear in the Mail tab.
Step 11
You're all set
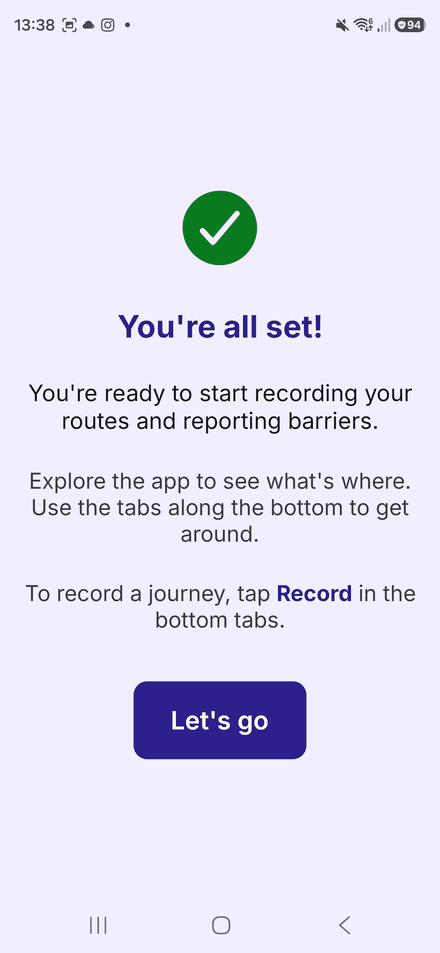
That's the whole setup — You're all set! ends the wizard. There is no long permissions checklist any more; if a setting needs fixing later, the app tells you when you go to record.
Part 3: Your mobility device
Step 12
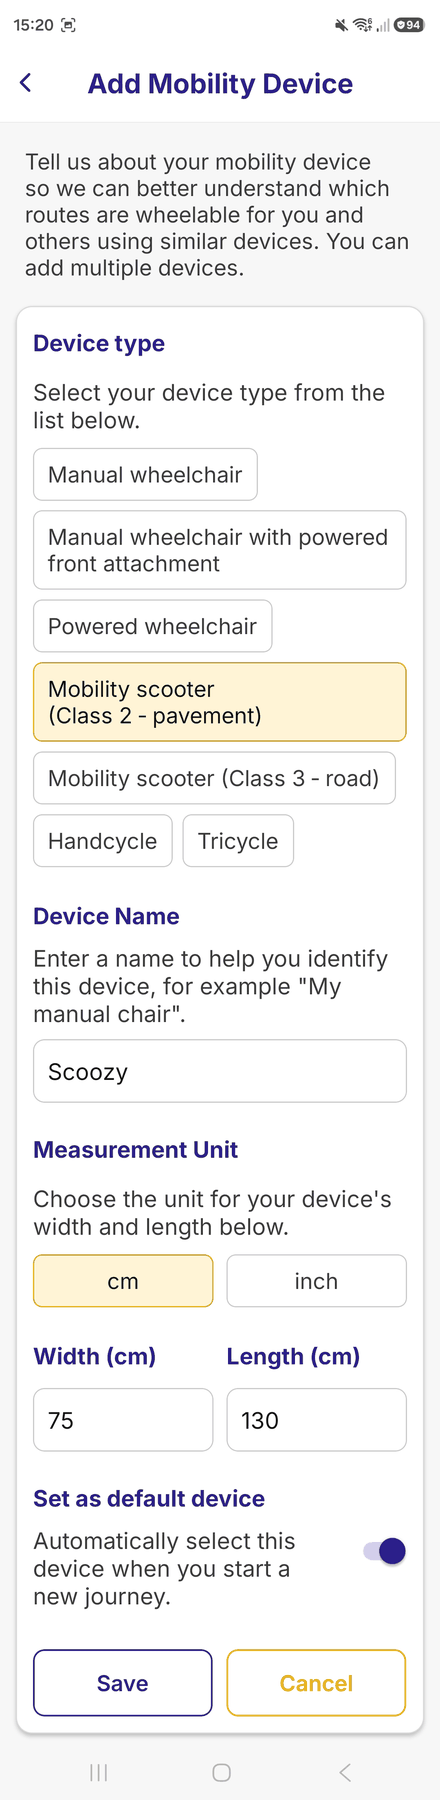
Add your mobility device
Tell the app what you wheel on — give the device a name, pick its type, and add its dimensions if you know them. Journeys are linked to a device (anonymously) so we can understand which routes work for which wheels. You can add more devices any time from Me → Mobility Devices, and choose between them each time you record.
Part 4: The England pilot study (optional)
Step 13
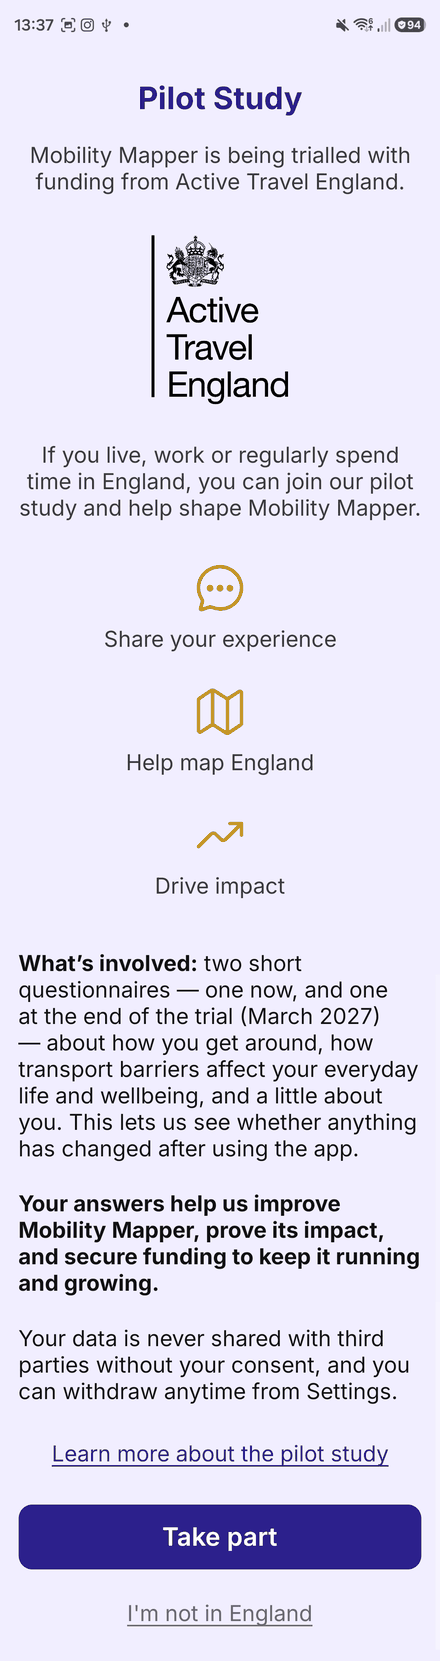
Join the pilot study
If you live, work or regularly spend time in England, you can join our pilot study, funded by Active Travel England. It involves two short questionnaires — one now, one at the end of the trial in March 2027. Tap Take part, or I'm not in England to skip it. You can use every part of the app either way, and join later from Settings if you change your mind.
Step 14
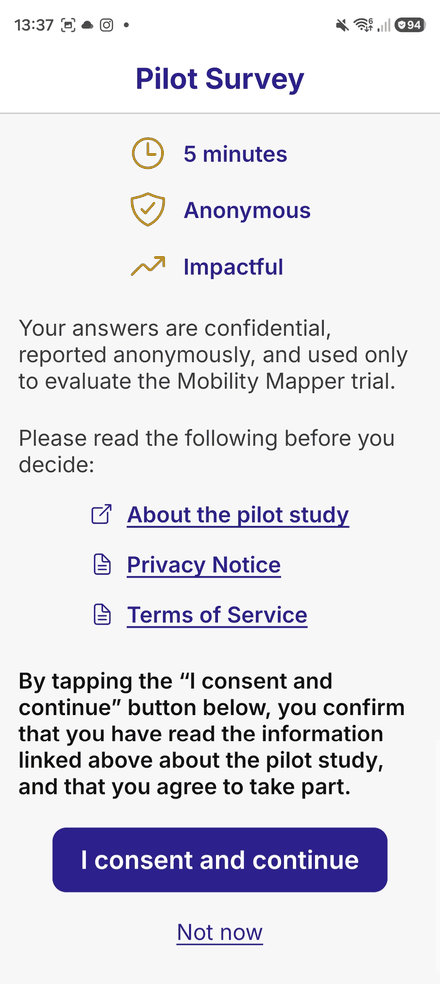
Fill in the short survey
The Pilot Survey takes about 5 minutes and your answers are anonymous. Read the linked information, then tap I consent and continue to see the questions, or Not now to leave it. Your answers save as you go, so you can stop part-way and finish later from Settings.
Part 5: Finding your way around
Step 15
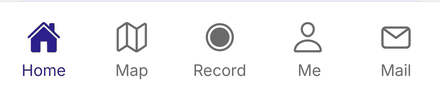
The five tabs
Everything lives behind five tabs along the bottom: Home, Map for browsing what's around you, Record for journeys, Me for everything you've added, and Mail for messages — it shows a badge when you have something unread.
Step 16
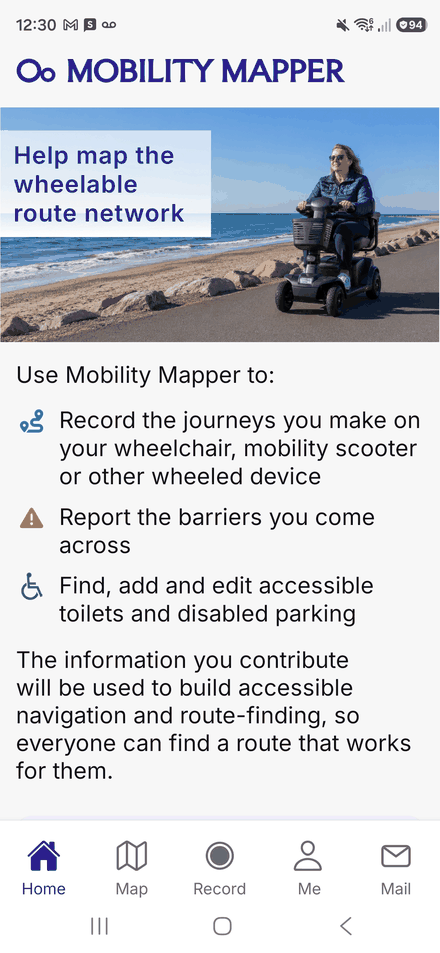
Your Home screen
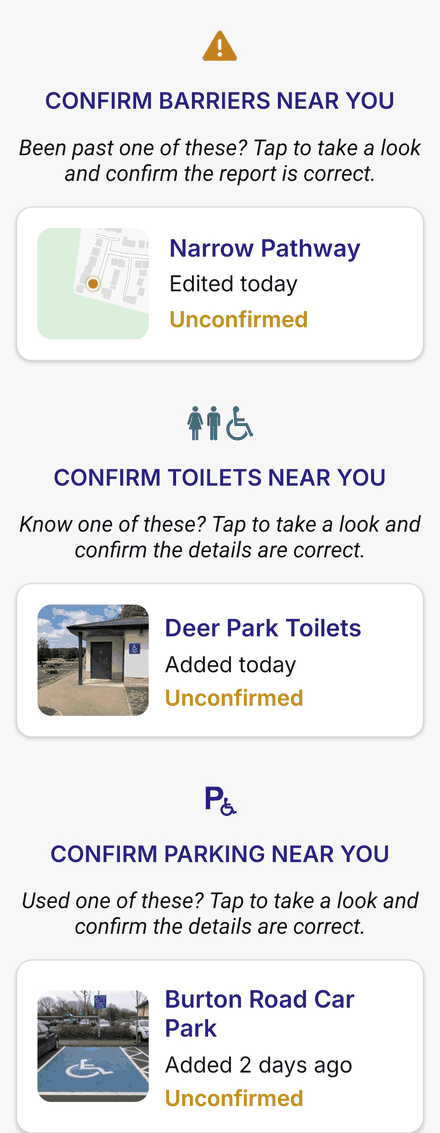
Home is where the app opens. Scroll through it for a Take a tour of the app button, News & Updates from the team, the pilot survey card if you're eligible, and then the Confirm Barriers Near You, Confirm Toilets Near You and Confirm Parking Near You sections — more on those in Part 8.
Step 17
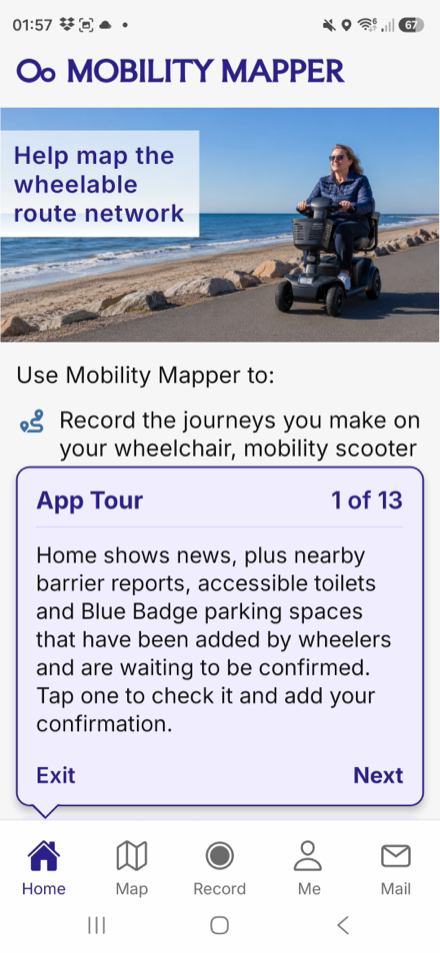
Take the tour
The 10-stop App Tour visits each tab and explains it on a card — a couple of minutes well spent. Start it from Home, or later from Settings → Take the app tour. The first time you open the Map tab, Map Tips gives you the same kind of guided introduction to the map controls.
Step 18
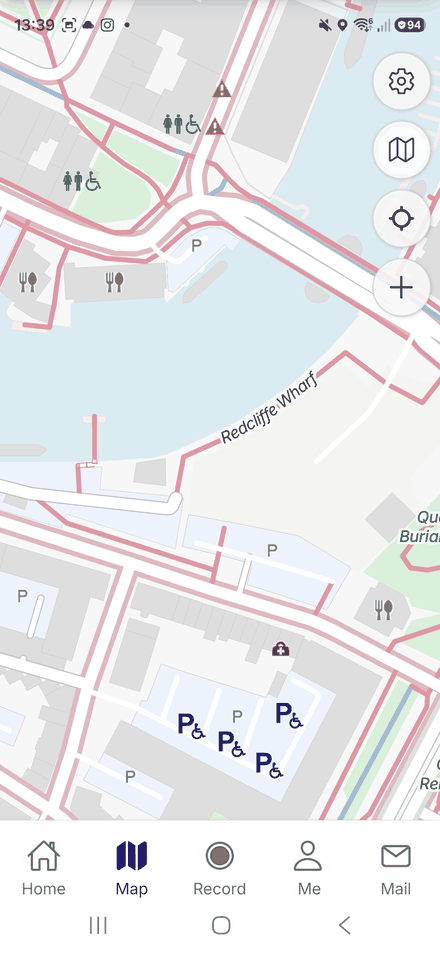
The Map tab
The Map tab shows footways, cycleways, reported barriers, accessible toilets and Blue Badge parking. Tap any marker for its details. And it's not just your own area — pan anywhere in the UK to see what's there before a trip. The + button adds things to the map (Part 7).
Step 19
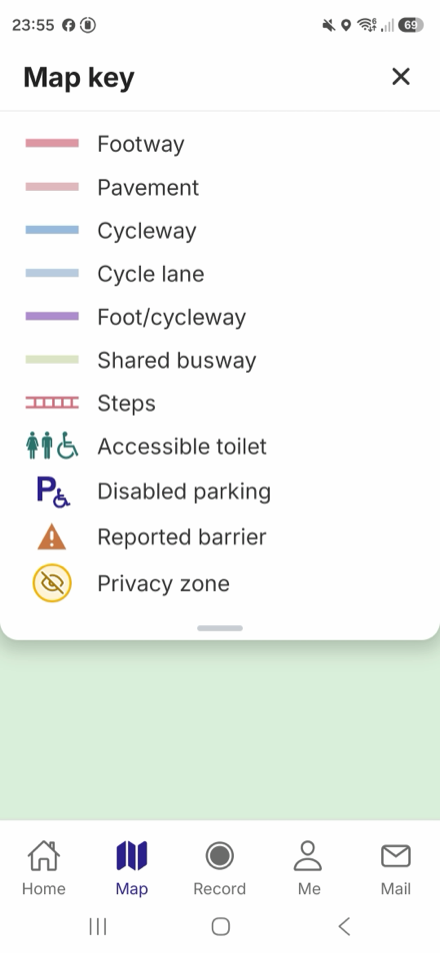
The map key
Tap the map's key icon for the Map key — what each line style means: footways, pavements, cycleways, steps, shared busways and more, plus the markers for accessible toilets, disabled parking, reported barriers — and your privacy zones, which only you can see.
Step 20
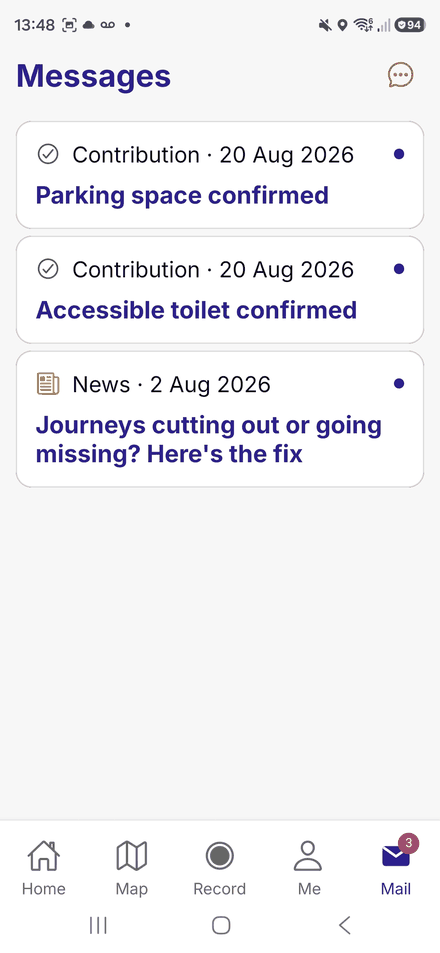
The Mail tab brings you news and announcements from the team — and tells you when another wheeler confirms or edits a barrier, toilet or parking space you added. Tap any message to read it in full.
Step 21
Contact and feedback
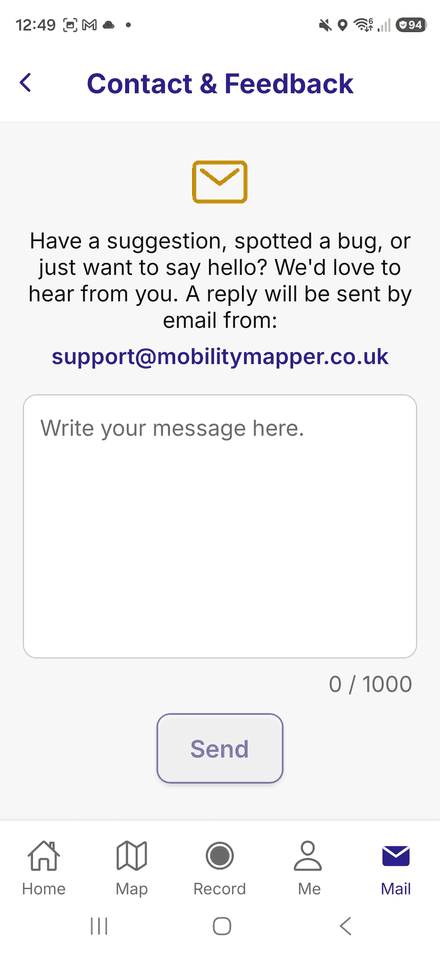
Spotted a bug, or want to suggest something? The speech-bubble icon at the top of Mail opens Contact & Feedback — write your message and we'll reply by email.
Part 6: Recording a journey
Step 22
Start recording
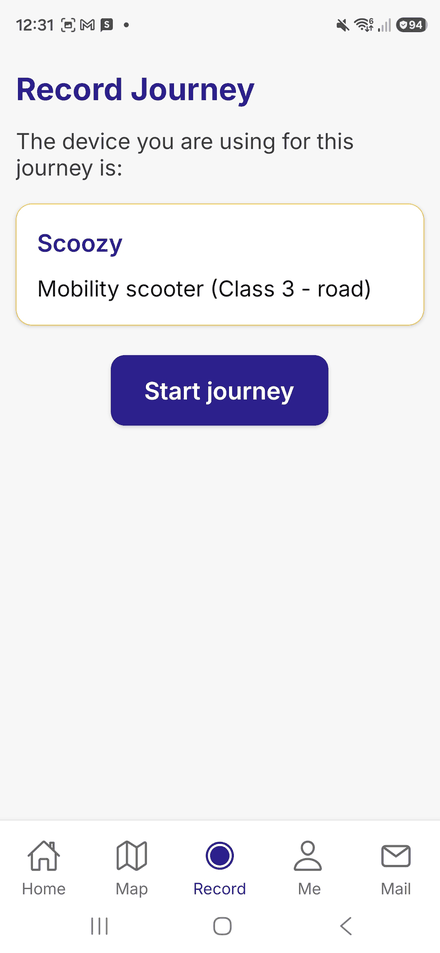
Open the Record tab. Your mobility device is already selected — tap it to record with a different one. Then tap Start journey. If anything on your phone needs fixing first, a Settings to change list appears above the button and walks you through each item.
Step 23
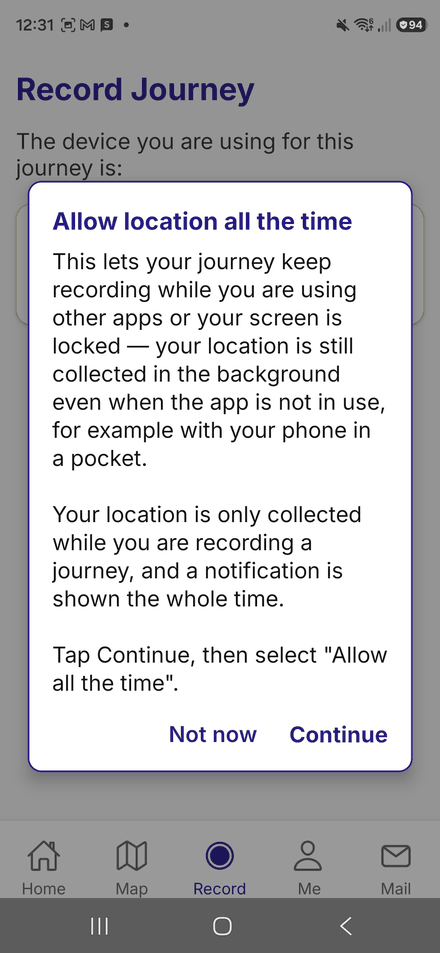
Allow location all the time
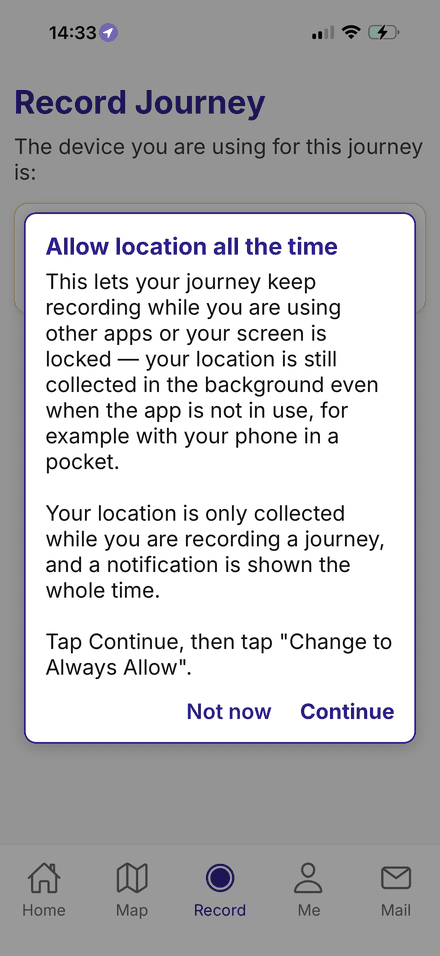
The first time you start a journey, the app asks for background location, so recording keeps working with your screen locked or other apps open. Your location is only collected while you are recording, and a notification shows the whole time. Tap Continue, then iPhone: tap Change to Always Allow — or if iPhone sends you to Settings instead, choose Location → Always there.Android: select Allow all the time on the settings page that opens. You won't be asked again.
Step 24
Travel your route
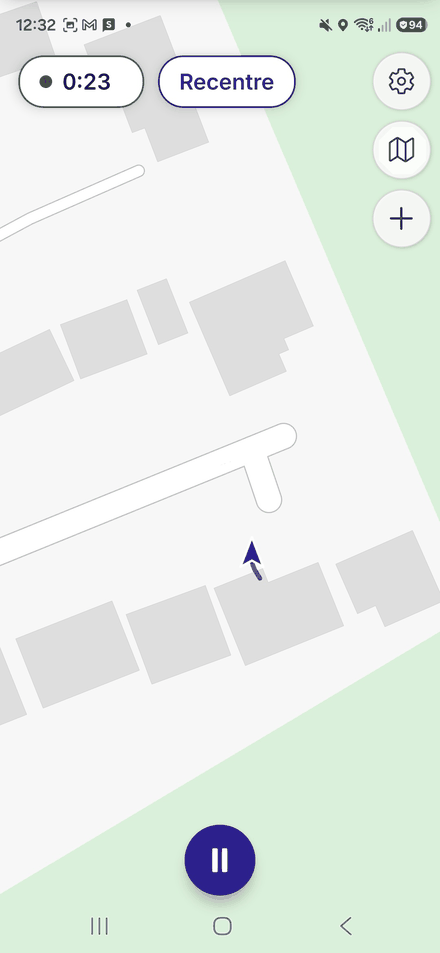
That's it — make your journey as normal. The timer pill shows recording is on; you can lock the screen and pocket the phone, and the app keeps tracking in the background. The map controls stay available while you record, including the + button for adding what you find (Part 7).
Step 25
Pause and finish
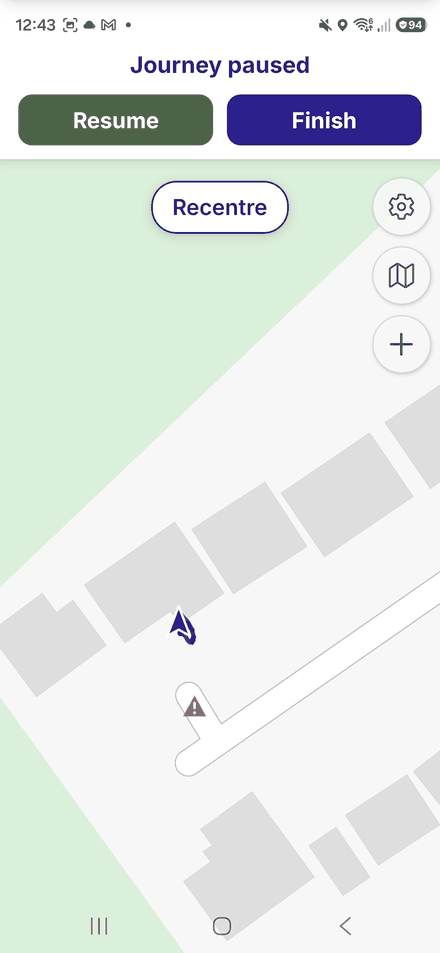
Press and hold the round pause button — a quick tap just shows a hint. Once paused, tap Resume to carry on, or Finish to end and save the journey. Pausing first is how you finish.
Step 26
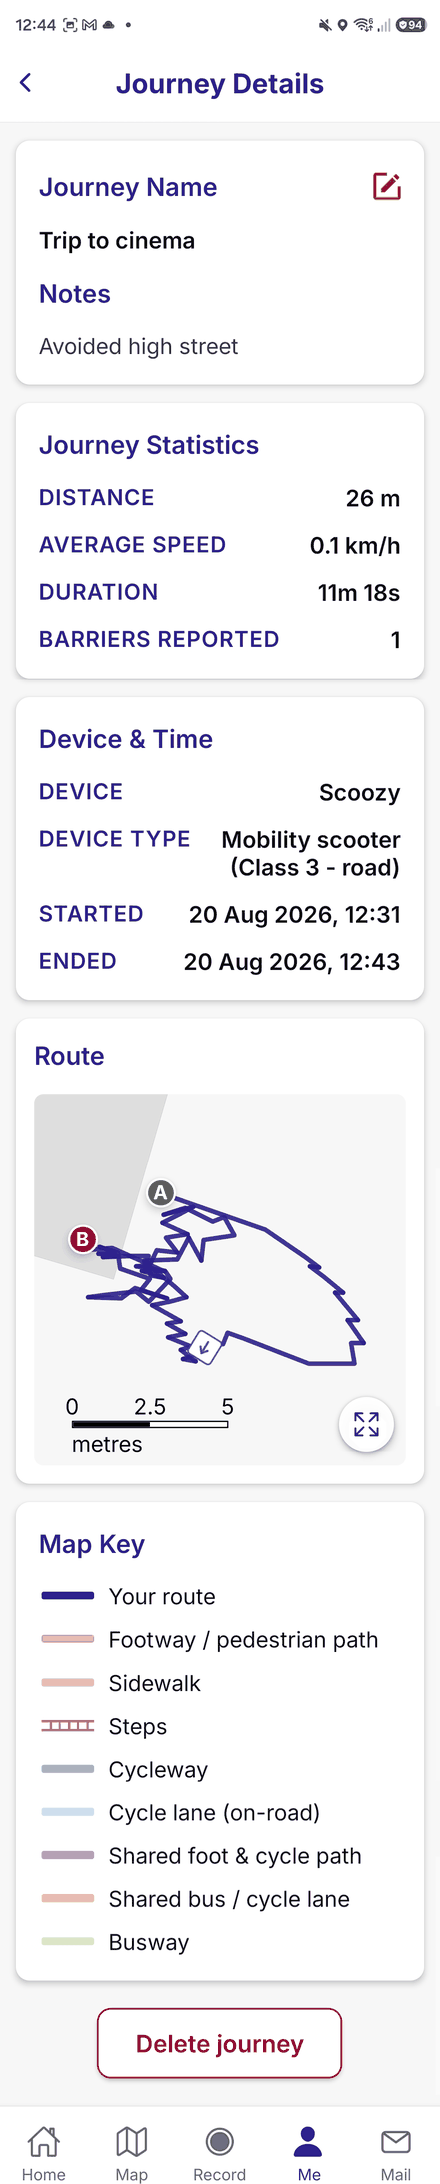
Name your journey
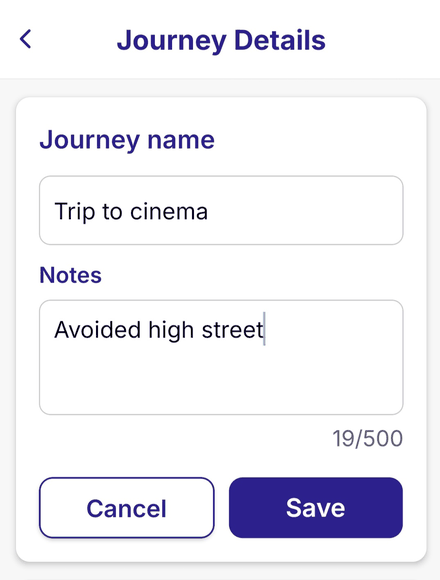
After finishing you can give the journey a name and notes — “Trip to cinema, avoided the high street” tells us more than a date stamp ever could. Both can be edited later from the journey's page.
Step 27
Your journey, on the record
Every journey gets a page under Me → Journeys: distance, duration, average speed, barriers reported on the way, the device you used, and the route drawn on the map with its own key. Not happy with one? Delete journey is at the bottom.
Part 7: Adding to the map
New to reporting barriers? Read what to report and how to photograph it before you start.
Step 28
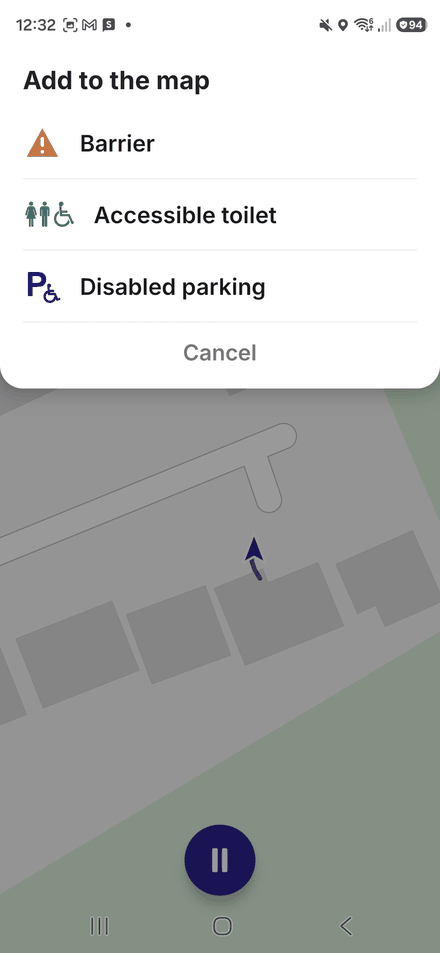
Add to the map
Tap the + button on the Map tab — or on the live map while recording — and choose Barrier, Accessible toilet or Disabled parking. You can also add from your lists under Me.
Step 29
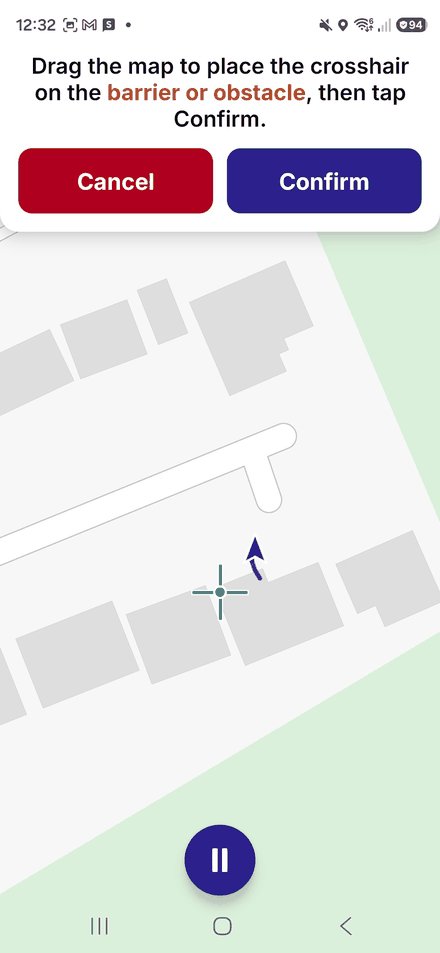
Place the barrier
For a barrier, drag the map so the crosshair sits exactly where the problem is, then tap Confirm. Check the location on the review screen and use Edit if it needs adjusting — reports help most when they're pinned to the right spot.
Step 30
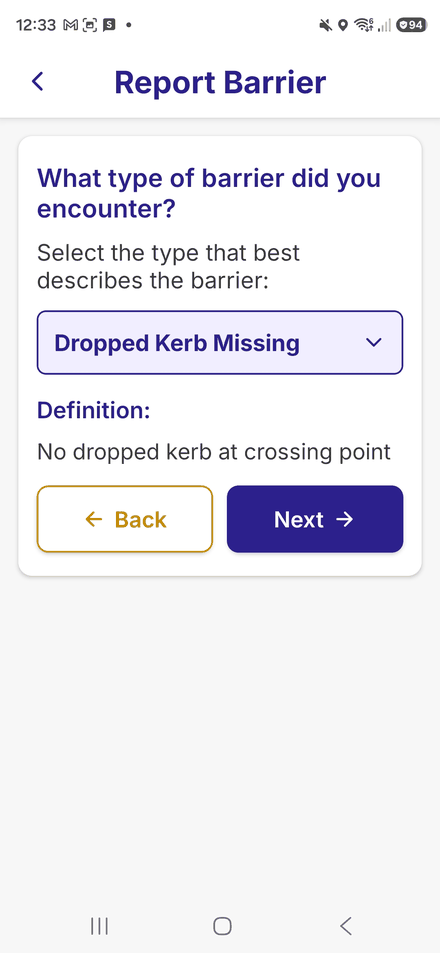
Choose the barrier type
Pick the type that best describes the barrier — each shows a short definition so you can check it fits. This is the only box you must fill in; Next stays greyed out until you choose.
Step 31
Describe it (optional)
Add a sentence of description if you want to — what's there, and how it affects you. Up to 500 characters, entirely optional.
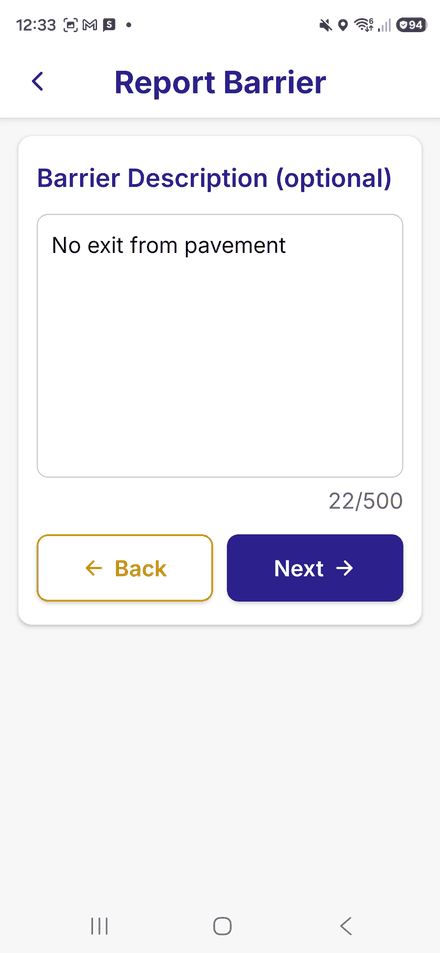
Step 32
Add photos (optional)
Up to three photos help others judge the problem at a glance — Take Photo or pick from your Gallery, or Skip.
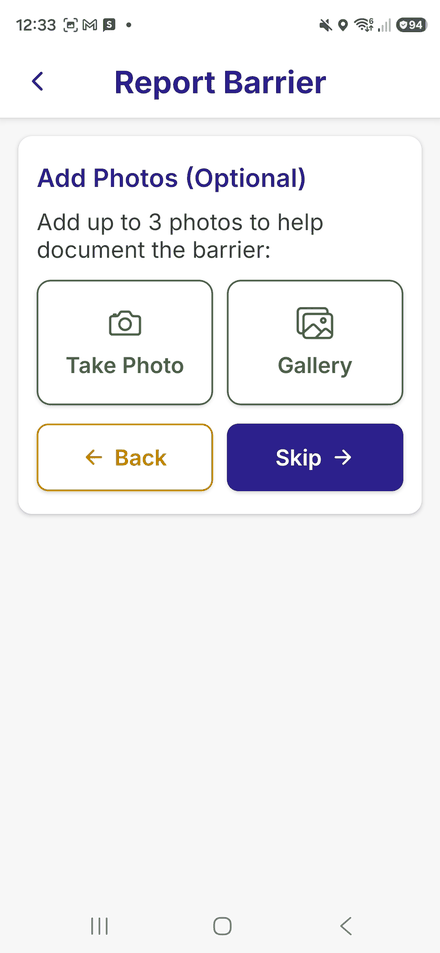
Step 33
Check and send
Review Your Report shows everything before it goes — tap Edit next to anything you want to change, then Submit. Your barrier appears on the map for every wheeler.
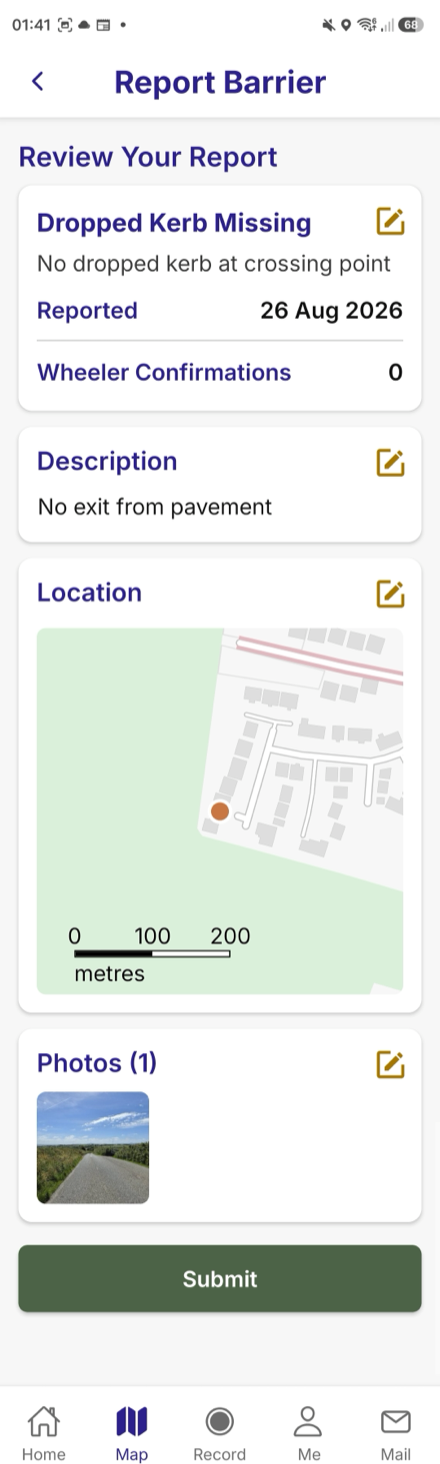
Step 34
Add an accessible toilet
Toilets follow the same pattern: place it on the map, then fill in the details that matter — a name, and Yes / No / Not sure for a RADAR/NKS key, baby changing, whether it's attended and whether it's free. Only the name is required.
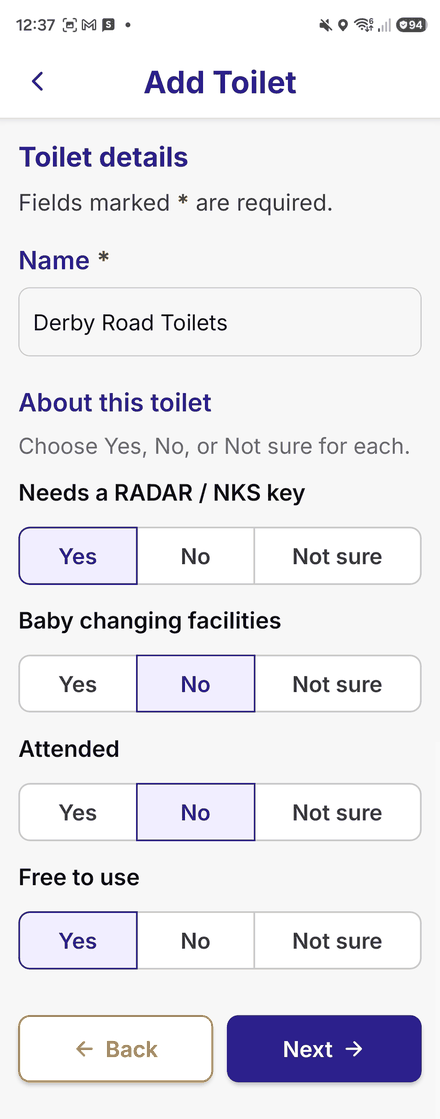
Step 35
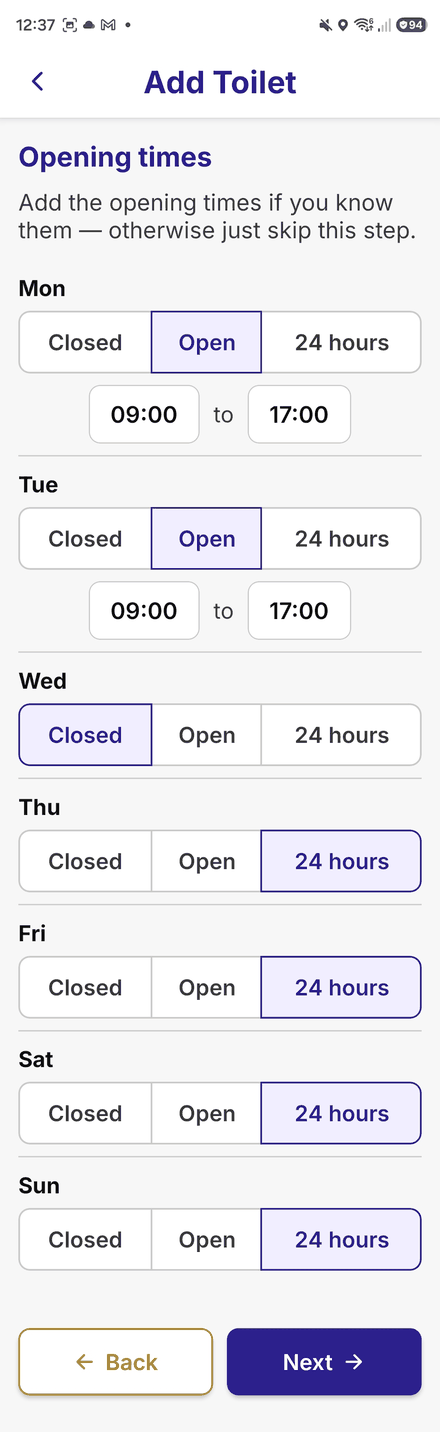
Opening times and notes
Add opening times if you know them — per day, Closed, Open with hours, or 24 hours — otherwise just skip the step. A notes box catches anything else useful (“access to right of building”), and photos are optional as always.
Step 36
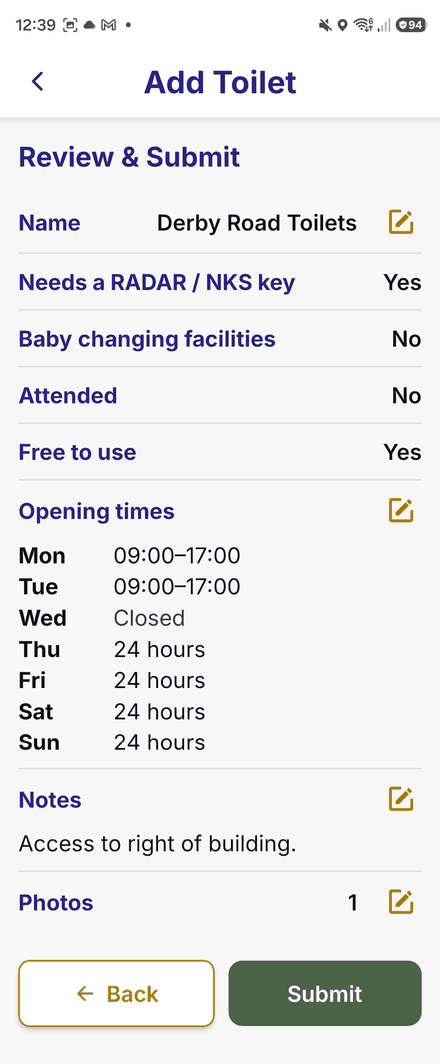
Review your toilet
Review & Submit reads the whole entry back — every line has an edit icon — then Submit puts it on the map.
Step 37
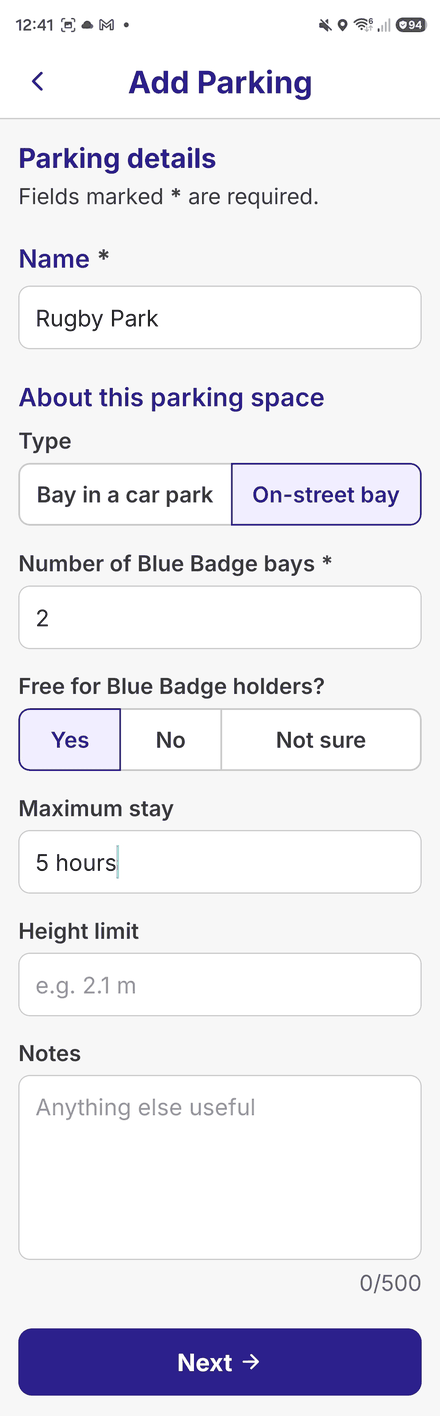
Add disabled parking
Parking asks for the details Blue Badge holders plan around: a name, whether it's a bay in a car park or an on-street bay, how many Blue Badge bays, whether it's free for Blue Badge holders, the maximum stay, and any height limit.
Step 38
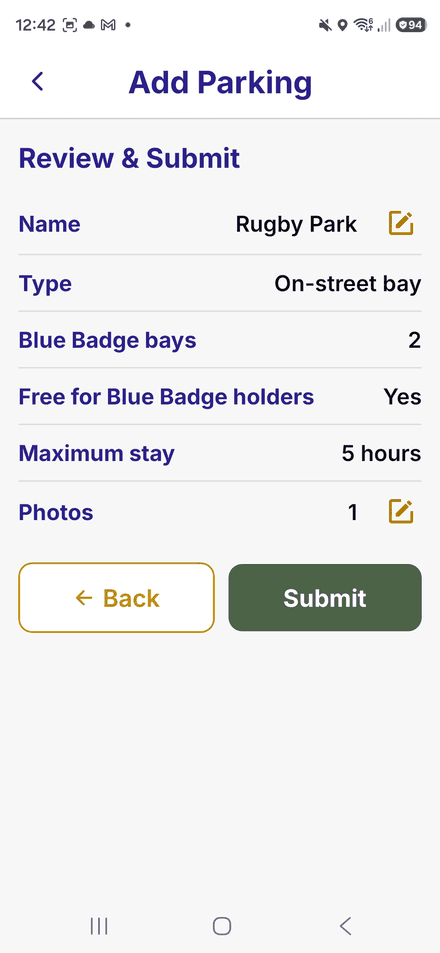
Review your parking space
The same Review & Submit step, then it's live. Everything you add can be edited or deleted later from its page — and other wheelers can confirm it, which is Part 8.
Part 8: Confirming and editing together
Step 39
Confirm things near you
The map stays trustworthy because wheelers check each other's additions. When something is added near you, it appears on Home under Confirm Barriers, Toilets or Parking Near You, marked Unconfirmed. Tap one you know.
Step 40
Check it and confirm
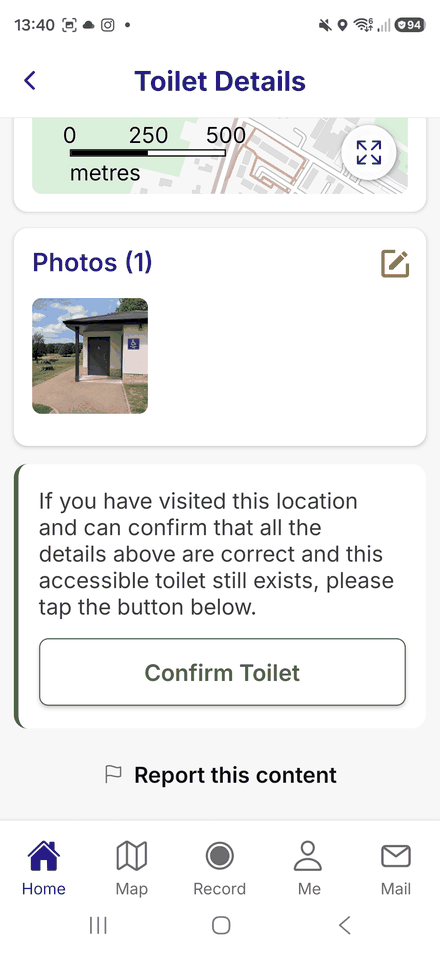
If you've been there and the details are right, tap Confirm Toilet — or Confirm Barrier or Confirm Parking — and confirm in the dialog. The more confirmations something has, the more it can be trusted. If something looks wrong or inappropriate, Report this content is at the bottom of every page.
Step 41
Confirmed — and kept up to date
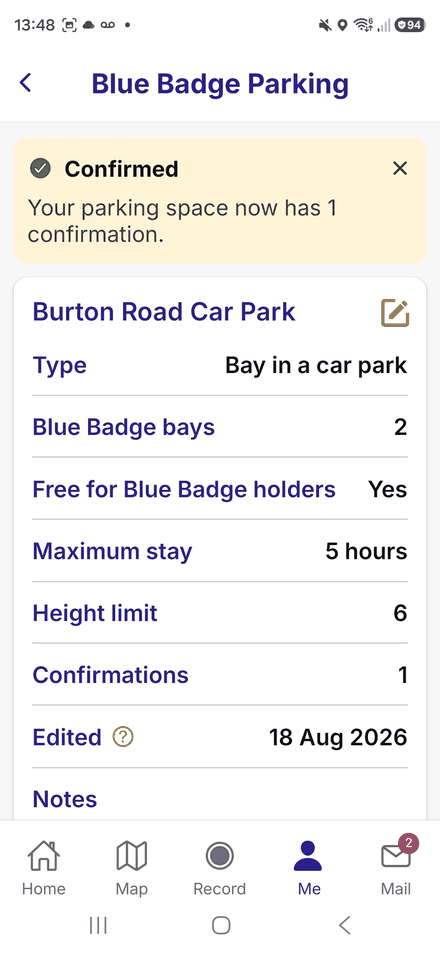
The person who added it hears the good news in Mail, and the confirmation count appears on the item for everyone. If details have changed — new opening times, more bays — tap the edit icon on the item's page and fix them. Your own additions can be confirmed and edited by others the same way.
Part 9: Using the app offline
Step 42
No signal? Keep going
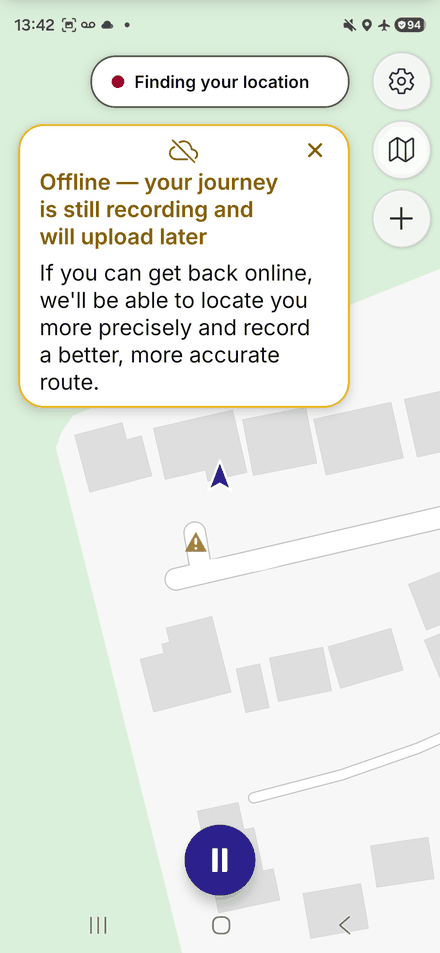
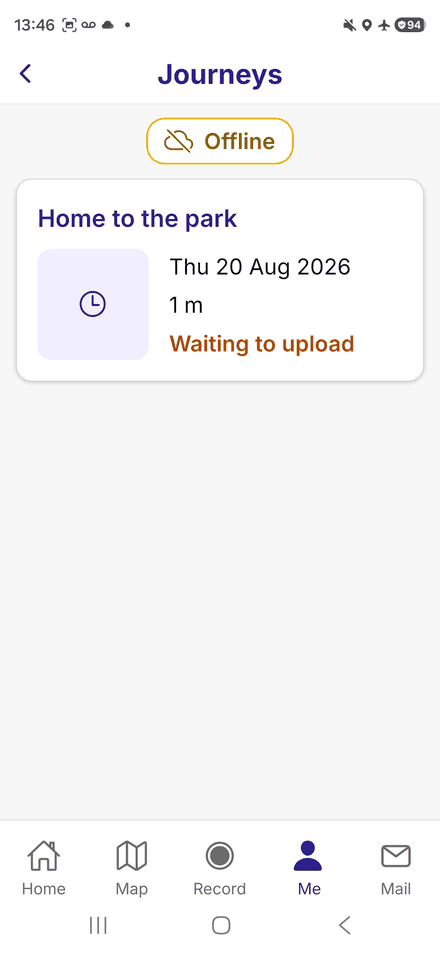
You don't need a connection to use Mobility Mapper. Recording carries on without one — an Offline pill appears, and everything you record, report or add (photos included) is saved on your phone. Only the map itself needs a connection to load new areas.
Step 43
It uploads itself
Anything saved offline is marked Waiting to upload under Me — you can open it, name it and check its details while you wait. The moment you're back online, it uploads by itself. Nothing to do, nothing lost.
Part 10: Your journeys and contributions
Step 44
The Me tab
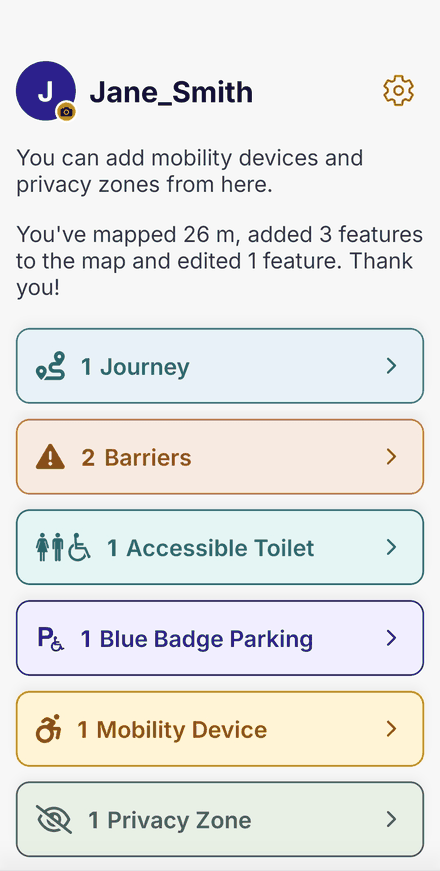
Me collects everything that's yours behind six buttons — Journeys, Barriers, Accessible Toilets, Blue Badge Parking, Mobility Devices and Privacy Zones — each showing how many you have. The Settings cog sits at the top.
Step 45
Your contributions
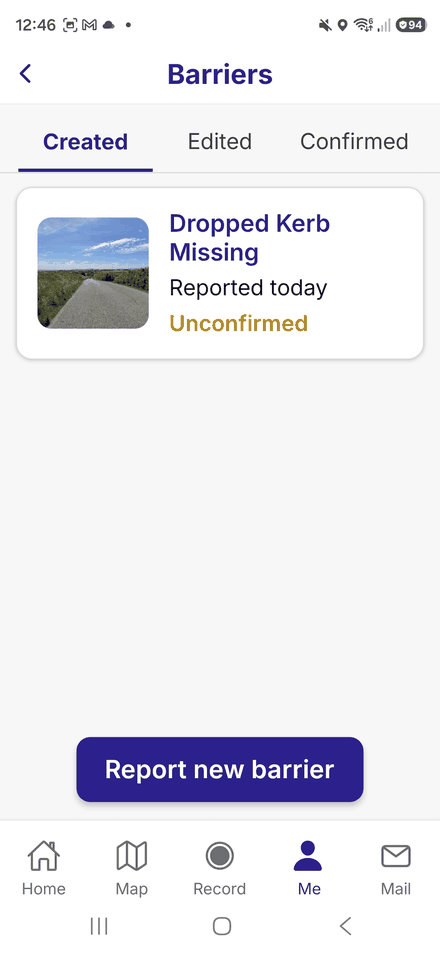
The Barriers, Accessible Toilets and Blue Badge Parking lists show what you've Created, Edited and Confirmed, on their own tabs. Each list also has a button for adding a new one directly.
Step 46
Your devices
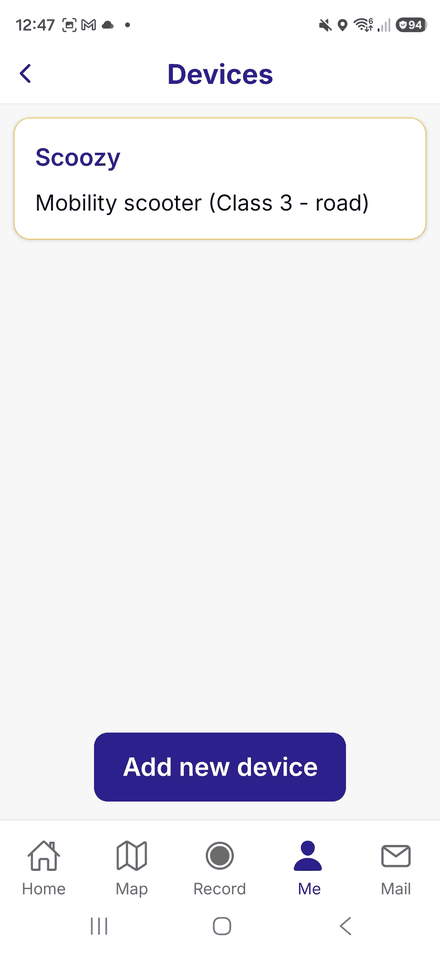
Mobility Devices lists what you wheel on. Add as many as you use — you pick the one you're on each time you record.
Step 47
Privacy zones
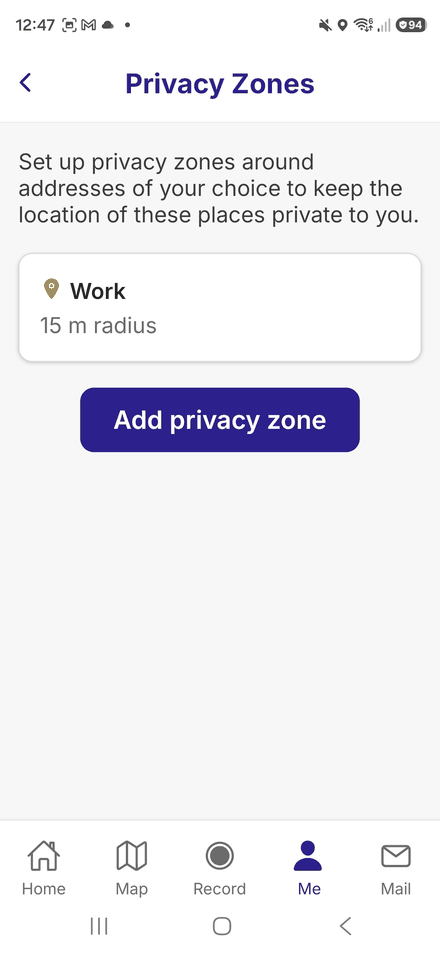
A privacy zone hides the part of any journey that passes near a place you choose — home, work, anywhere — before it leaves your phone. Tap Add privacy zone, place it, set the radius (15–50 metres) and name it. Zones are yours alone: nobody else ever sees them.
Part 11: Settings and your account
Step 48
Settings
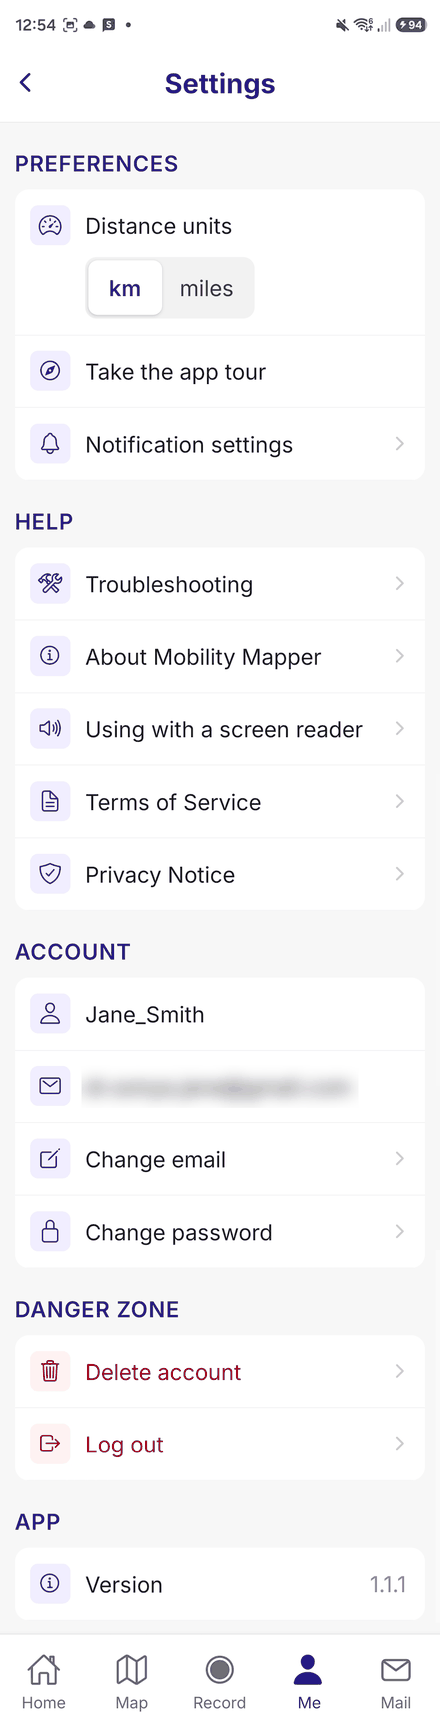
The cog at the top of Me opens Settings: distance units (km or miles), Take the app tour, Notification settings, and if you're eligible, joining the pilot study. Under Help sit Troubleshooting, About, the screen-reader guide and our policies; under Account, Change email and Change password. The app version is at the very bottom.
Step 49
Deleting your account
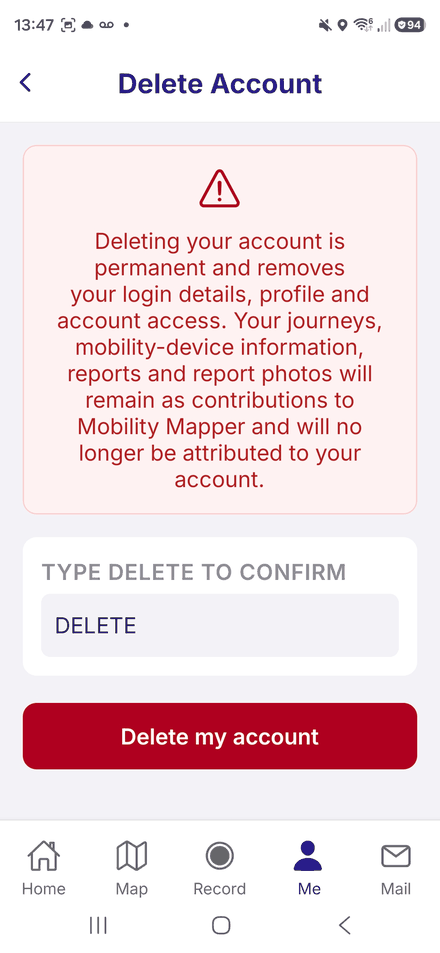
You can delete your account at any time, in the app: Settings → Delete account. It's permanent — the screen explains what goes and what remains as anonymous contributions — and you confirm by typing DELETE. If you can't sign in, our account deletion page covers the email route.
Tips
You can put your phone away once recording has started — lock the screen and pocket it, and the app keeps tracking in the background. If journeys come out short, check your phone's battery saver isn't restricting the app.
Press and hold to pause — a quick tap on the pause button only shows a hint. Once paused you can Resume, or Finish to save the journey.
Every journey counts — even short ones. A five-minute trip to the shops is just as valuable as a longer route.
No signal? Everything still works — journeys, reports and photos save on your phone, show as Waiting to upload, and send themselves when you're back online.